Agenda:
- Introduction
- What does this tool do?
- What does the tool look like?
- What ZIP file contain?
- Prerequisites
- Sitecore XM Migration GUI
- Sitecore XM Migration Console
Sitecore has lots of customers who developed their solution based on classic Sitecore OnPrem which exists in the market for 2 decades. Also, Sitecore released the XM Cloud, a fully SaaS solution in July 2022.
Lots of customers continue to use the OnPrem solutions, new customers prefer to use the SaaS version and of course, some would like to switch to it, but it requires lots of effort. Sitecore just released to the public a brand-new XM to XM Cloud Content Migration tool that assists in minimizing the account’s barriers to migrating to Composable DXP.
What does this tool do?
It helps migrate customers’ data from the source of the XM OnPrem instance to the XM Cloud account. It migrates the content, media, and internal users (but not custom site data at this moment).
Currently, the tool supports Sitecore 10.1+, the 10.0 and 9.x support will be available in future releases.
The tool leveraging existing supported serialization and transfer tools, takes care of connecting to source and target accounts, installing dependencies, validating, do related actions, and cleanup.
| Target scenarios | 1) Developer migrates data to dev environment, to enable the developing of a new solution. 2) Developer runs migration tool again for different content items, data from other sources, etc. 3) Developer repeats migration during development, to get the latest content (selectively migrate the latest content to dev). |
| Out of scope | DevOps merges the latest XM OnPrem content with the latest XM Cloud content (this is not the merge, diff or sync tool, it’s not supported). |
What does the tool look like?
The tool is delivered via zip files that contain execution files. One of the targets is to possibly make it open source in the future. The current builds have two options:
- Download page https://developers.sitecore.com/downloads/xm-cloud (the latest version is 1.1.154).
- Direct link for GUI – Sitecore.XM.Migration.GUI.v1.1.154.zip
- Direct link for CLI – Sitecore.XM.Migration.Console.v1.1.154.zip
In general, it has the same functionality, the CLI is more for automation, and GUI for a better user experience.
Important note: the tool must be run from the same Server where Sitecore instance is installed. This might be improved in future releases. (Note from 2024: for the v2 it’s not relevant anymore).
Note: the current version is v1.1.154, it will evolve and the UI may be updated.
Note: the version v1.1.151 is obsoleted, please use the newer version.
What ZIP file contain?
- EXE file which runs the application.
- README.md – I strongly recommend reading it as it has lots of useful information.
- docs folder with the description of the appsettings.json file, dependencies, FAQ, and current known issues.
Prerequisites
- Sitecore XM OnPrem with some content, media, or users.
- A Fresh XM Cloud.
Sitecore XM Migration GUI
Run the XMMigrationGUI.exe

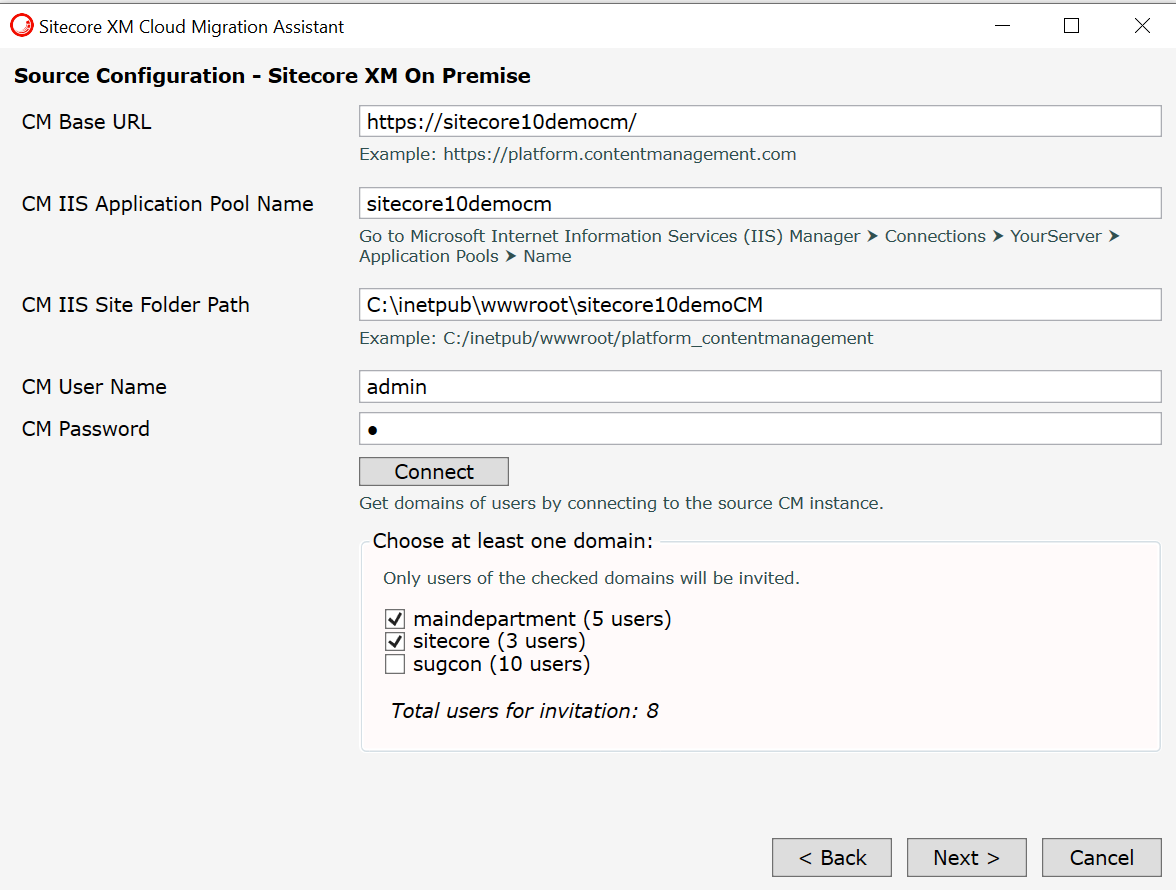
Click next and you’ll see the Source Configuration – Sitecore XM On Premise, please fill in the settings. You can check the settings in my example:

Click the Next button and fill in the Target Configuration – Sitecore XM Cloud settings. How to find one or another setting please follow the hints under each field:

Eventually, you should have settings similar to the following configuration:

When you click the Next button, you’ll see the Content Tree where you can choose which items to migrate:

Let’s proceed to the next wizard window:
Click the Next button and configure the Users Migration Target Settings:


As the last step for users configuration, choose an environment where you would like to invite users under the chosen organization.

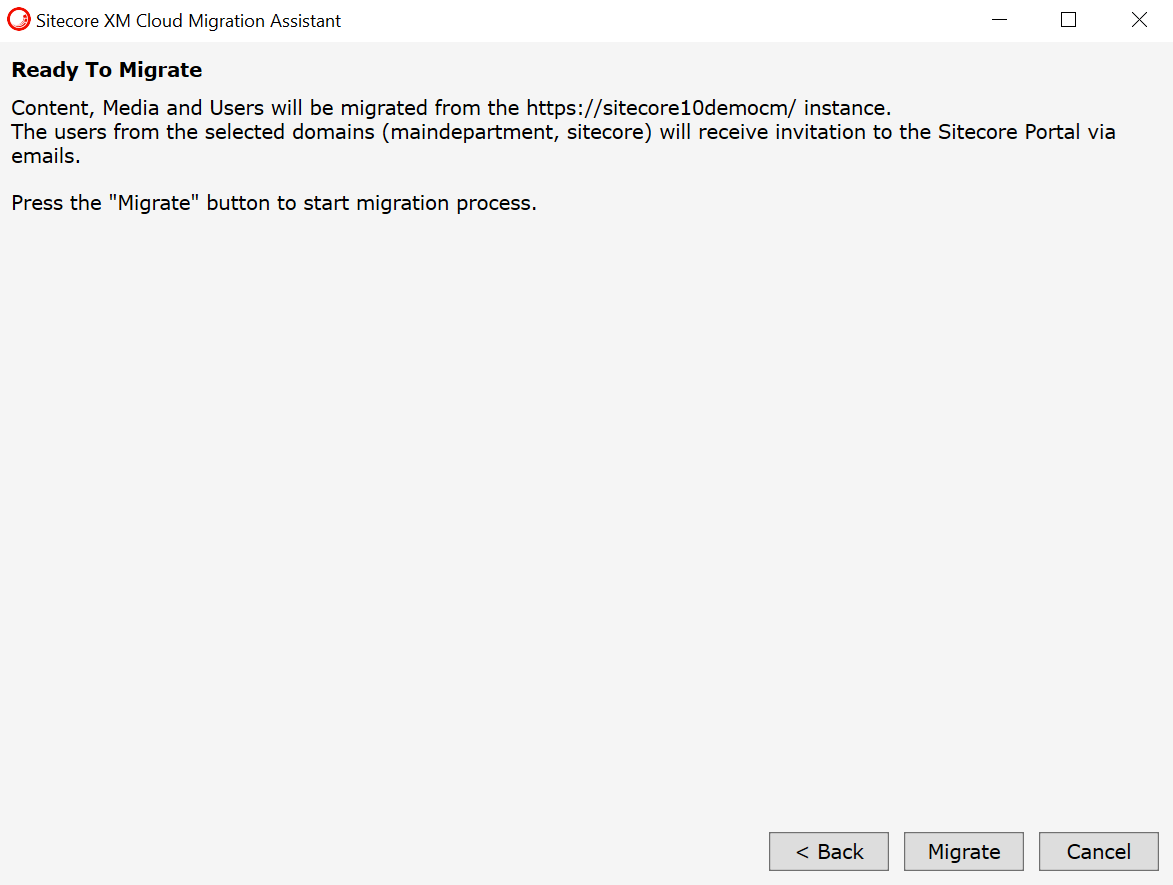
Click the Next button and check the summary just before the migration run:


If you need to run the application again, all the previous configurations will be saved in the appsettings.json file and you don’t need to fill in all the settings again. Also, this file has some configuration that you don’t need to touch, for example, endpoints to the Sitecore Portal, but there is an ability for you just in case any of the Sitecore endpoints are updated.
Also, it has additional settings related to which users to retrieve from the Source Sitecore instance, such as:
“AllowApproved”: true – retrieves only approved users
“AllowLockedOut”: false – do not retrieve locked-out users.
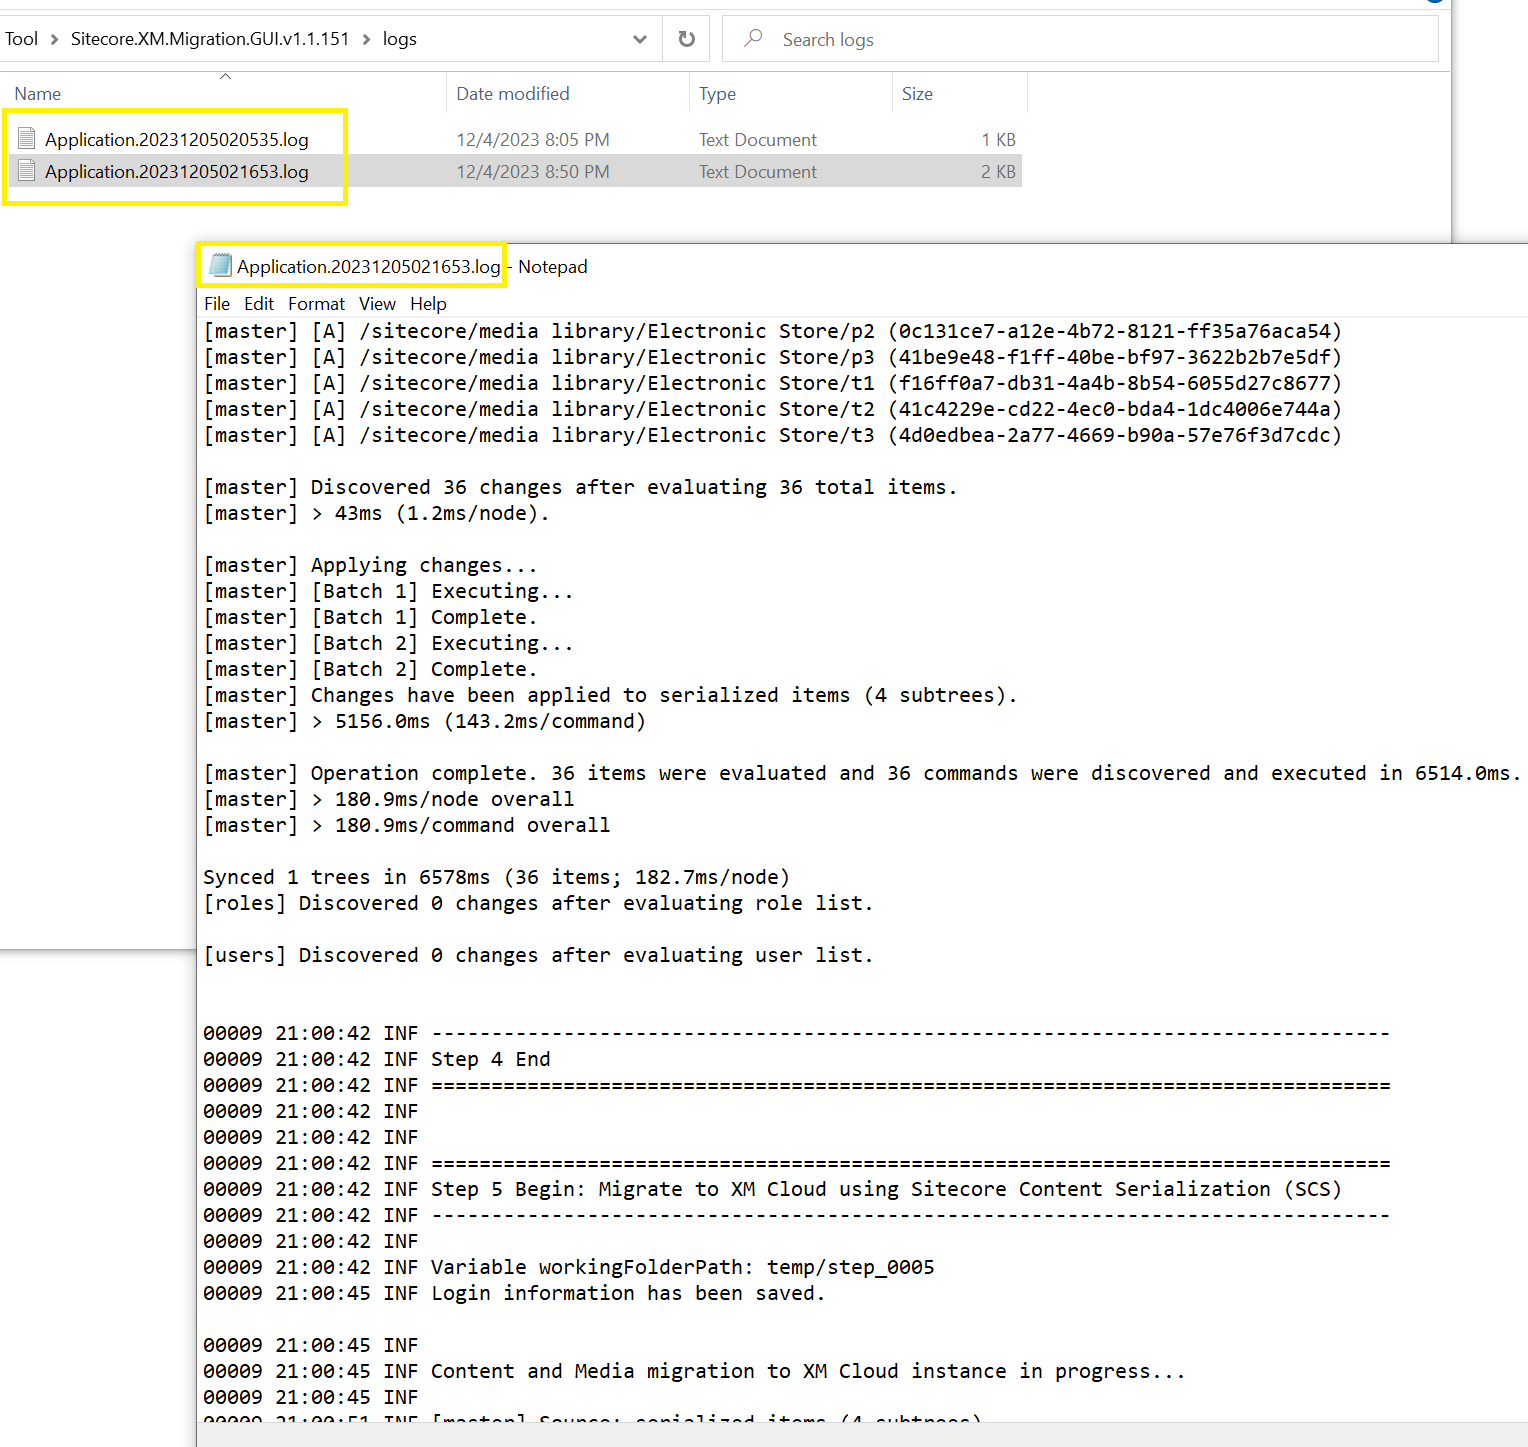
The root folder of the tool contains the logs folder, each time you run the tool, you’ll have the detailed logs during the run:
Sitecore XM Migration Console
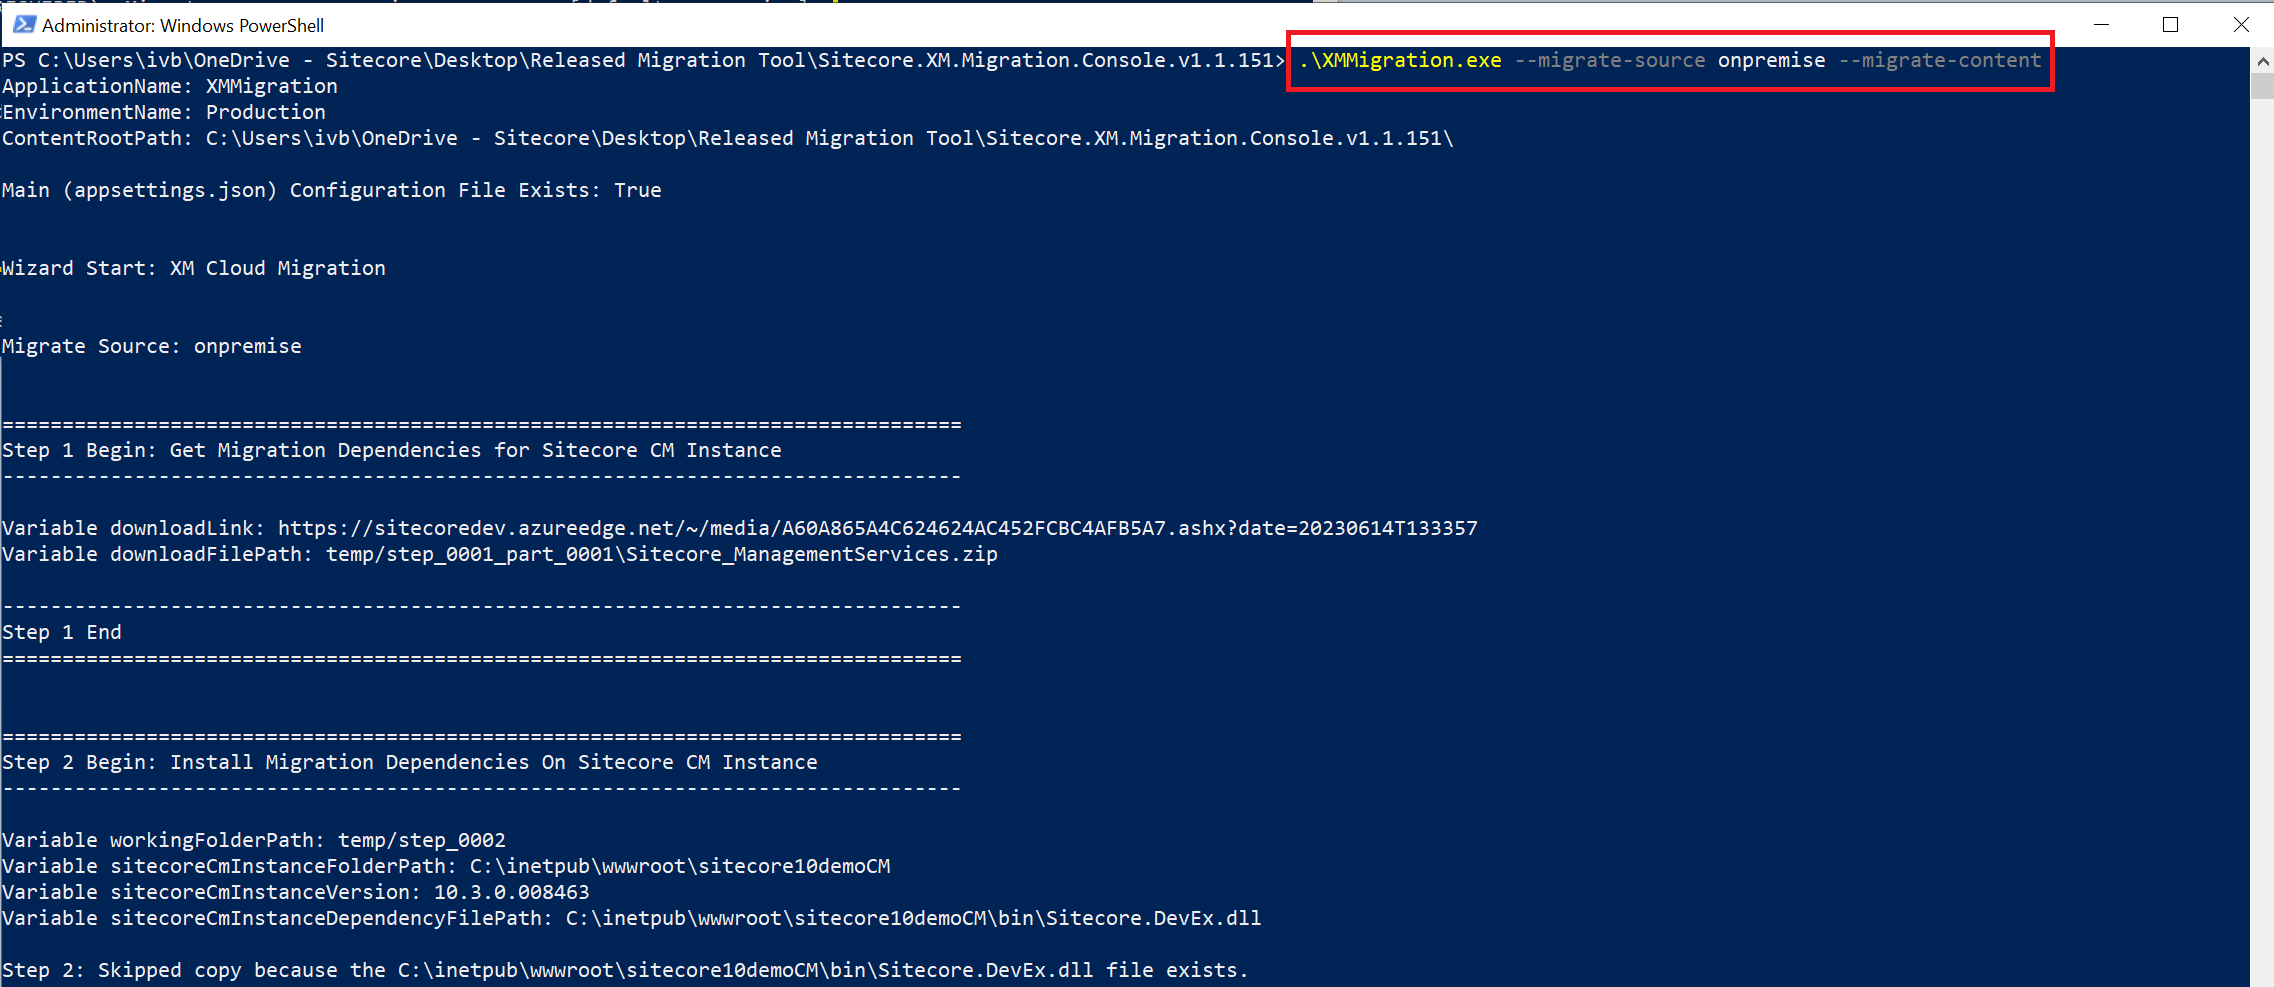
The Console tool in terms of functionality is the same and can be used for scripting/automation. Navigate to the folder of the console app and type the .\XMMigration.exe --help command, you’ll see a bunch of options:

Important: to have the same settings as you made in the GUI version you can just copy and replace the appsettings,json file or adjust it manually.
Migrate content .\XMMigration.exe --migrate-source onpremise --migrate-content
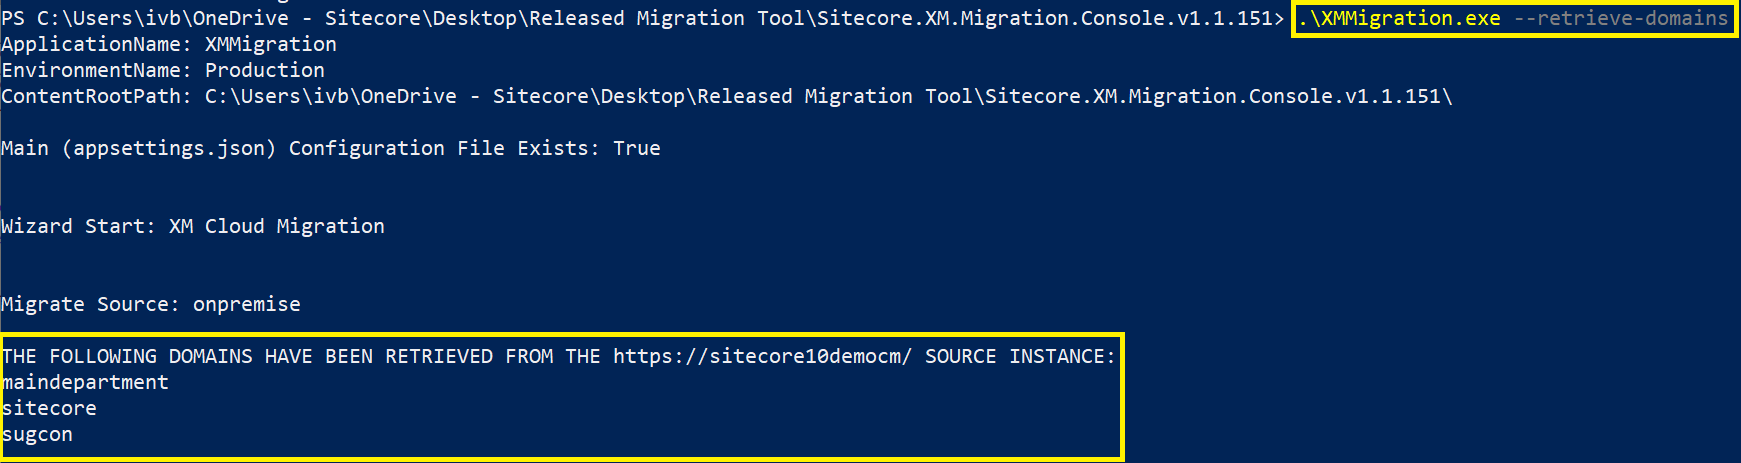
To retrieve the list of domains use the next command: .\XMMigration.exe --retrieve-domains
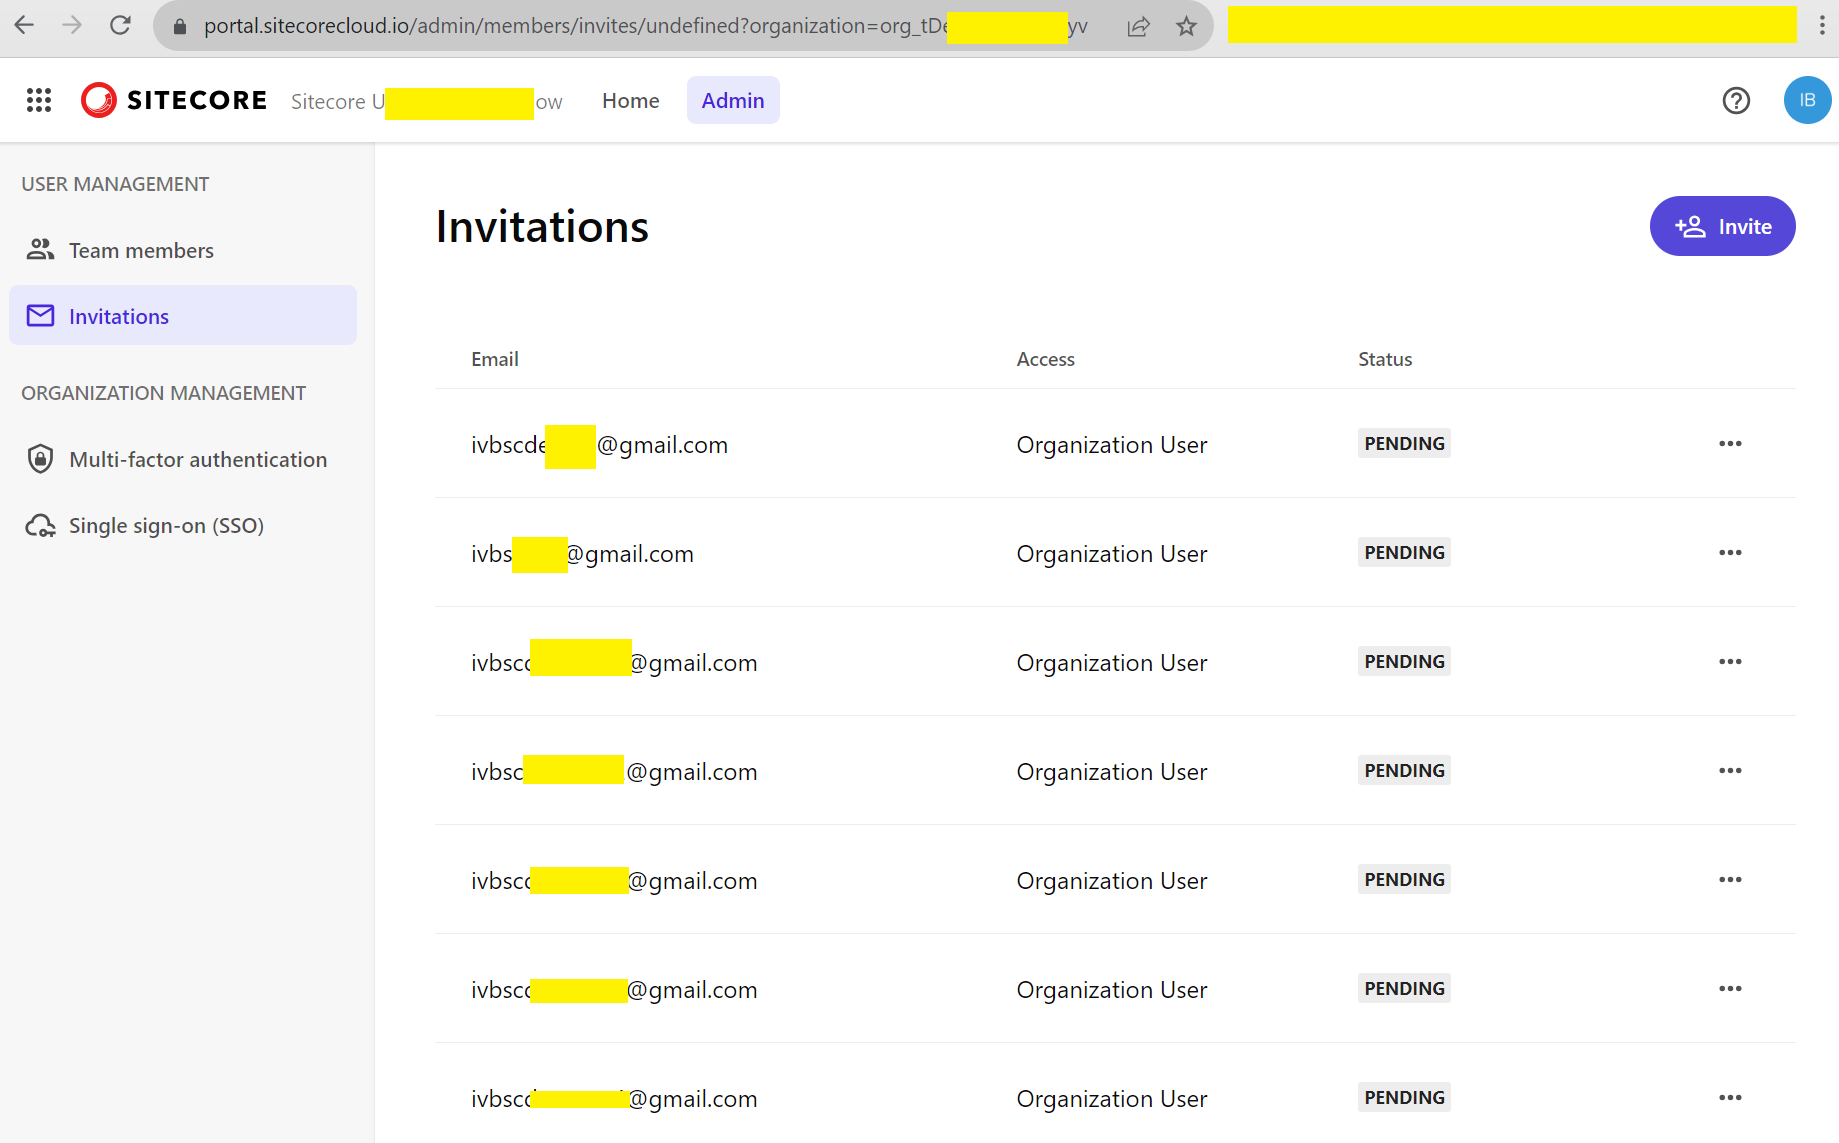
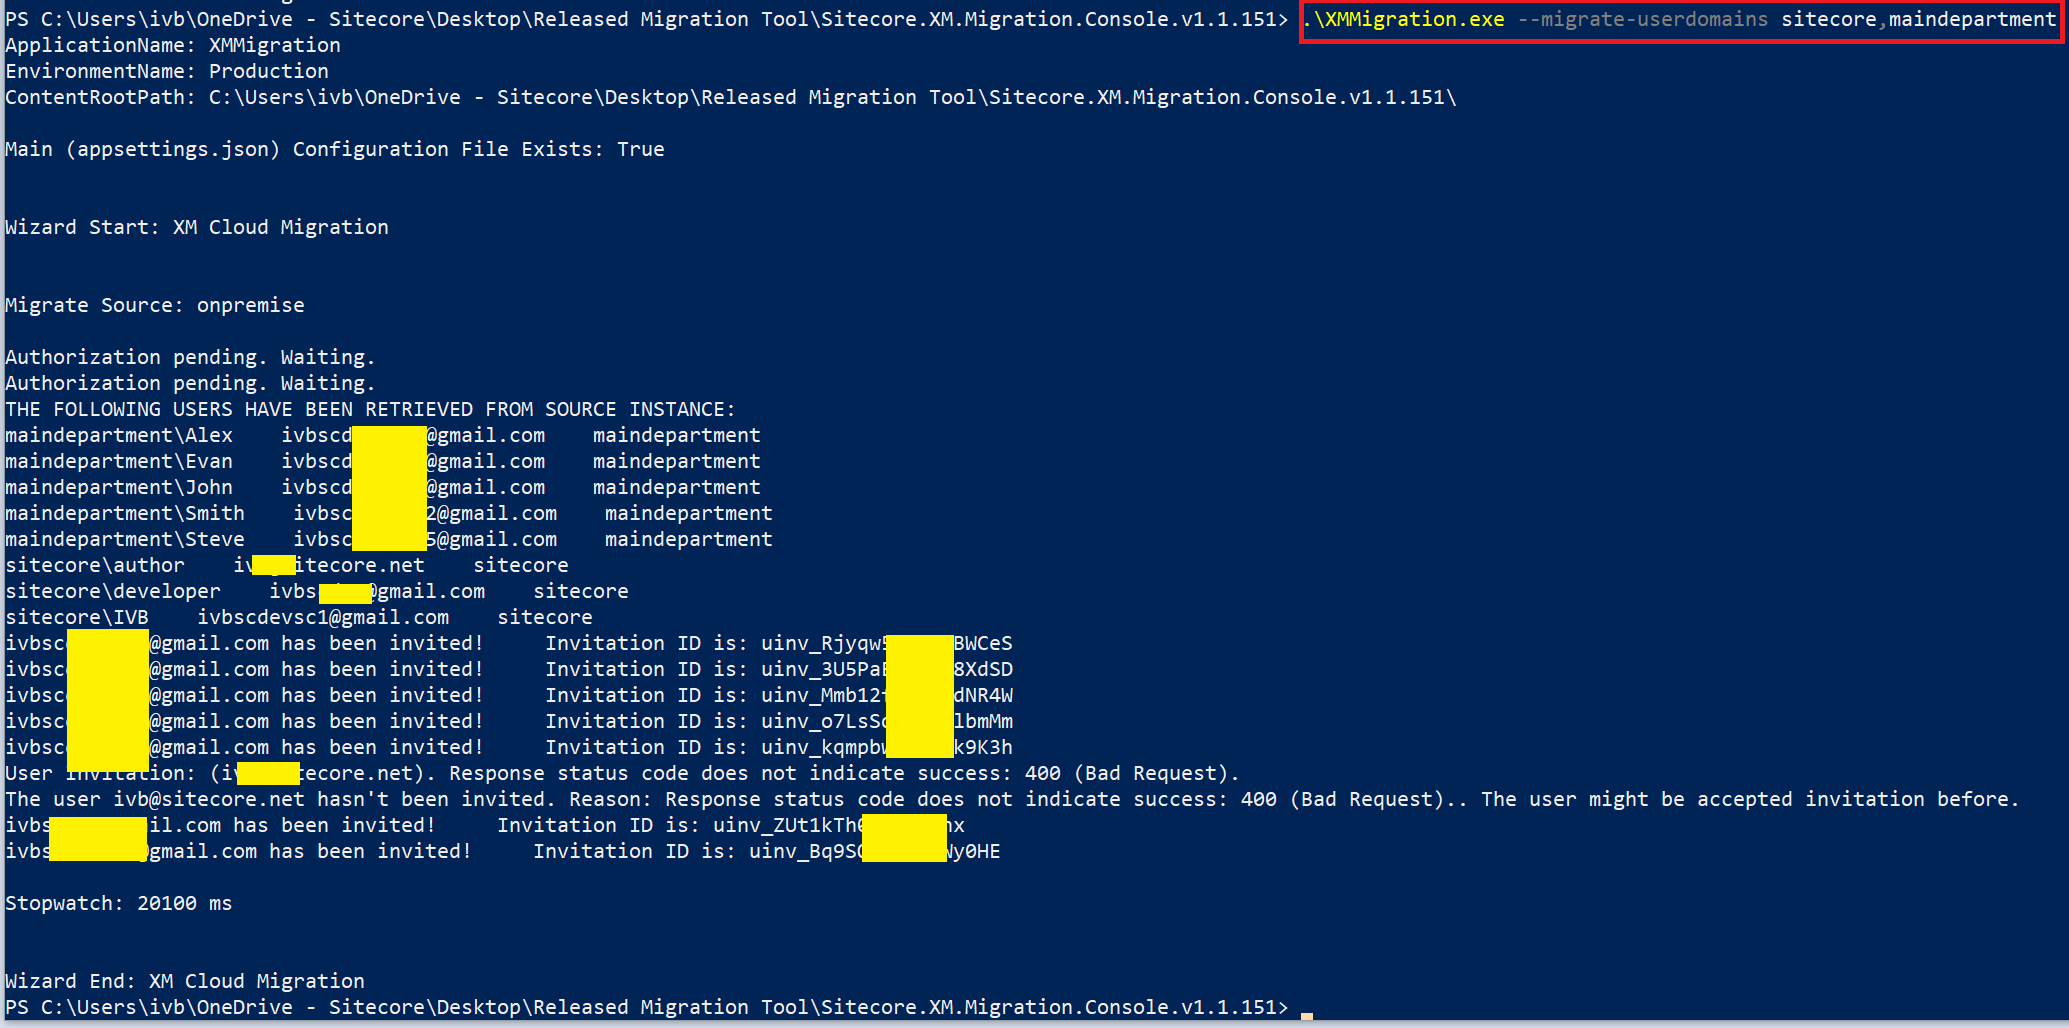
To invite users from the sitecore and maindepartment domains: .\XMMigration.exe --migrate-userdomains sitecore,maindepartment
Enjoy the tool and let me know if you have any questions or suggestions, your feedback is valuable! =)
Also, you contact us on the community Slack #xm-cloud channel.
* Future features discussed in this document are subject to change.

Good article to understand step by step to migrate content and other details to XM cloud. Is it possible to migrate content , media and users from traditional Sitecore application (either SXA or non SXA sites) to target XM cloud environment (headless)
LikeLike
Thanks Ravikumar, yes, it’s possible to migrate the mentioned content from traditional Sitecore (either SXA or non SXA sites) to the target XM Cloud.
LikeLike